

Devices and channels
Channels and soft sensors
Channel fields, visibility, sensor types and soft-sensor controls on a device.
Unlike the Sensor Data tab, which requires you to select one channel at a time, the Channels tab displays all channels simultaneously, each with its own summary information and graph. This article covers how to navigate the tab, manage channel visibility, edit channel details, and create soft sensors. Note: Most actions in the Channels tab are restricted to Super Users and Tenant Admins. Standard users can view channel information but cannot make changes.
Navigating to the Channels tab
Section titled “Navigating to the Channels tab”- From the main navigation, go to the Devices page.
- Locate the device you want to manage and click the right arrow on the right side of the device row. This opens the device configuration page.
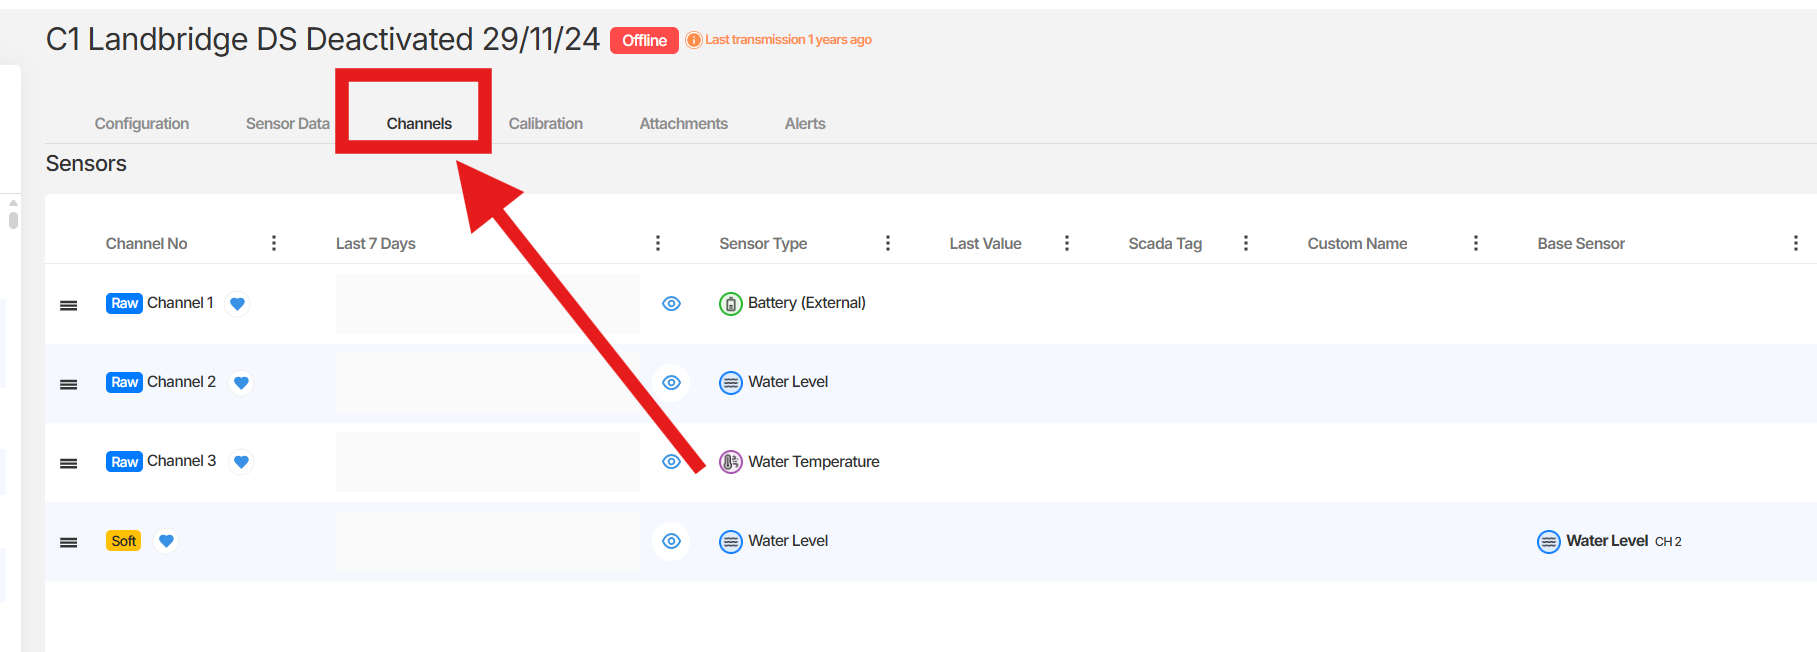
- On the device configuration page, click the Channels tab. This is the third tab in the top-left tab row.
What you can see in the Channels tab
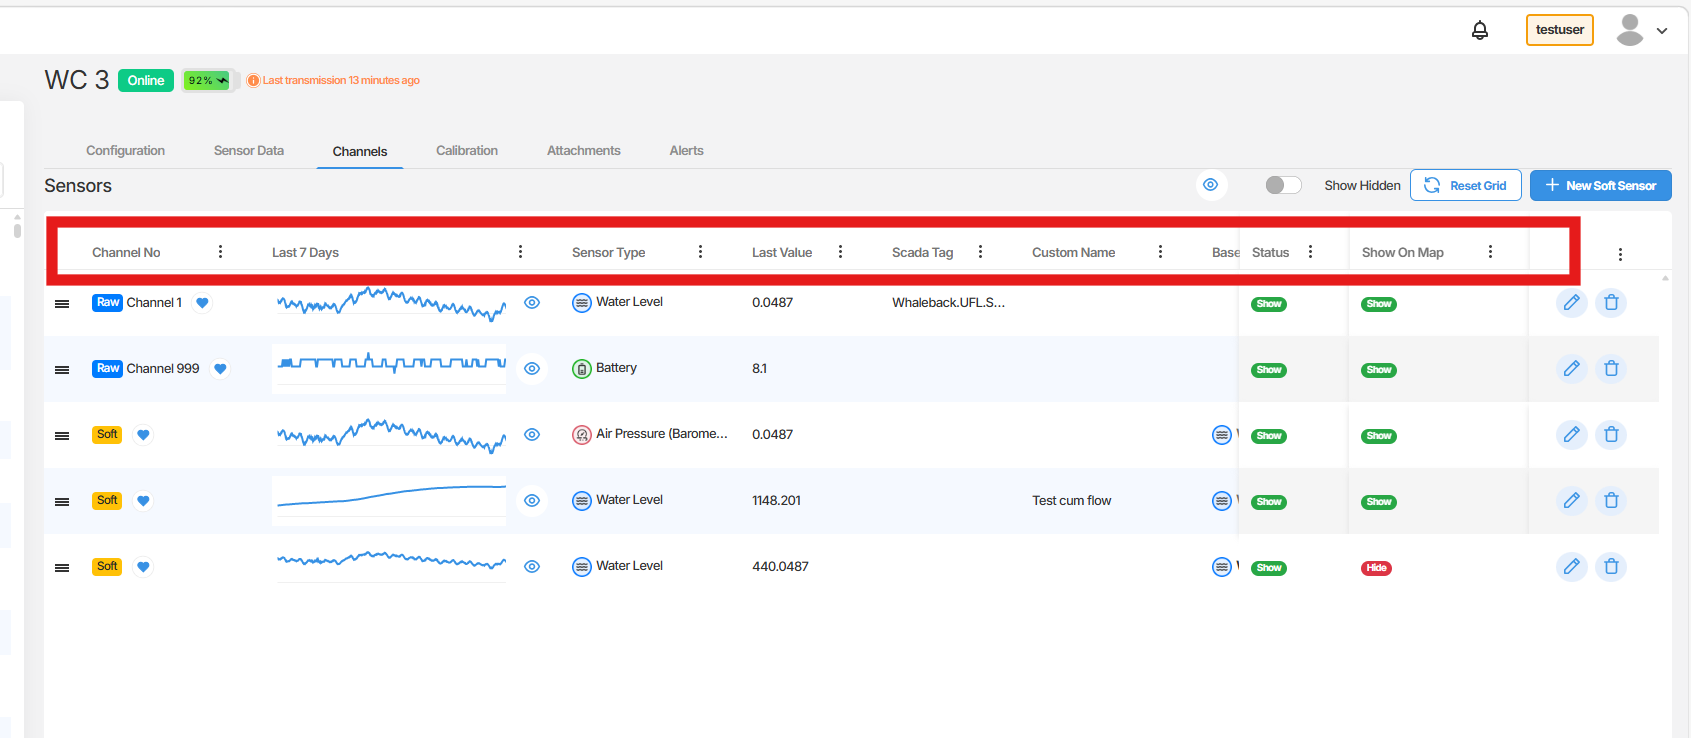
Section titled “What you can see in the Channels tab”Each channel is displayed as its own row or card, showing a summary of key information at a glance. For each channel, you can view:
- Channel number
- Last 7 days graph - a visual summary of recent readings
- Sensor type
- Last values - the most recent recorded readings
- Scada Tag
- Custom name
- Notes
- Status
Editing channel details
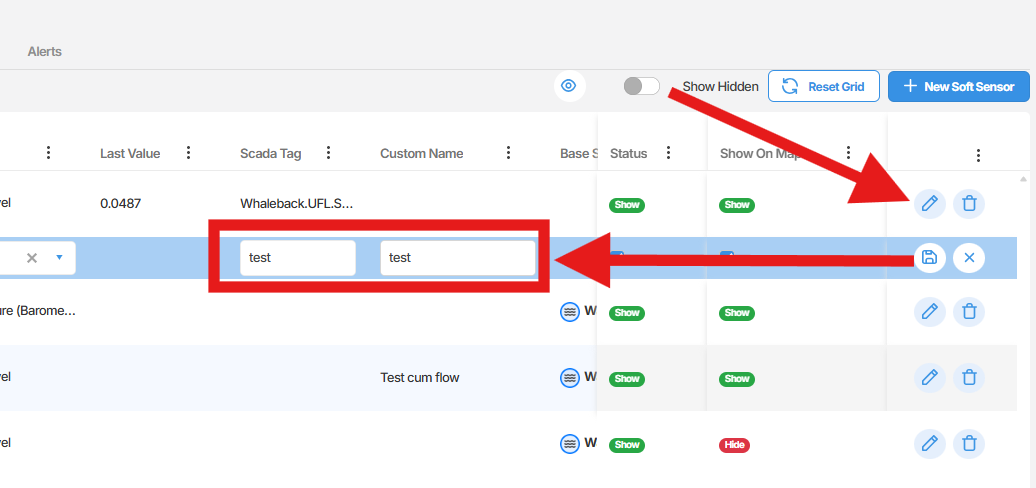
You can add or update a channel’s Scada Tag and Custom Name directly from the Channels tab. The Custom Name is used when exporting data, so it is recommended to populate this field if you require clearly labelled exports.
To edit a channel:
- Locate the channel you want to update.
- Click the pencil icon on the channel row.
- Update the Scada Tag, Custom Name, or any other available fields as required.
- Click Save to apply your changes.
Changing the sensor type
Section titled “Changing the sensor type”Each channel has an assigned sensor type that describes what the channel is measuring. When a new device is installed, channels are typically labelled as Unallocated until the sensor type is set.
To change the sensor type:
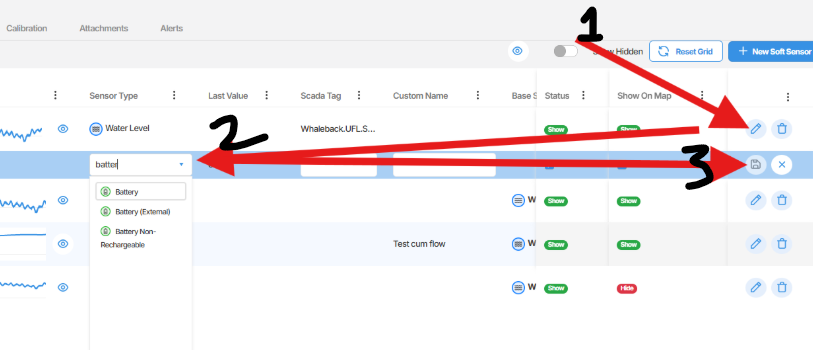
- Click the pencil icon on the channel you want to update.
- Select the appropriate sensor type from the Sensor Type pick list.
- Click Save to apply the change.
Hiding and showing channels
Section titled “Hiding and showing channels”If a device has channels that are not currently in use or are not relevant to your monitoring requirements, you can hide them to keep the view clear.
To hide a channel:
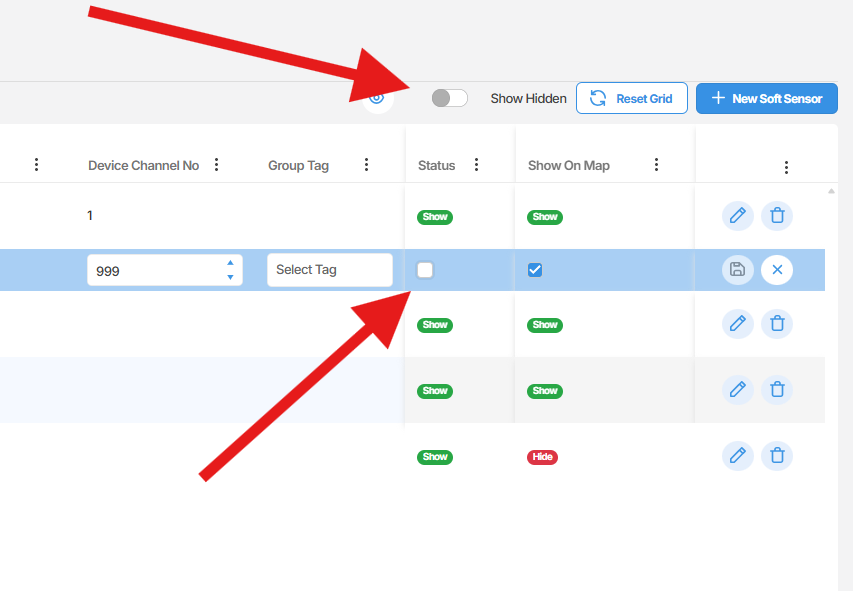
- Click the Edit button on the channel you want to hide.
- Set the Status to Hide.
- Click Save to apply the change.
To view hidden channels, click the Show Hidden toggle at the top of the Channels tab. This will make all hidden channels visible again without permanently restoring them.
Deleting a channel
Section titled “Deleting a channel”Channels can be permanently deleted from the Channels tab. This action requires Super User or Tenant Admin access.
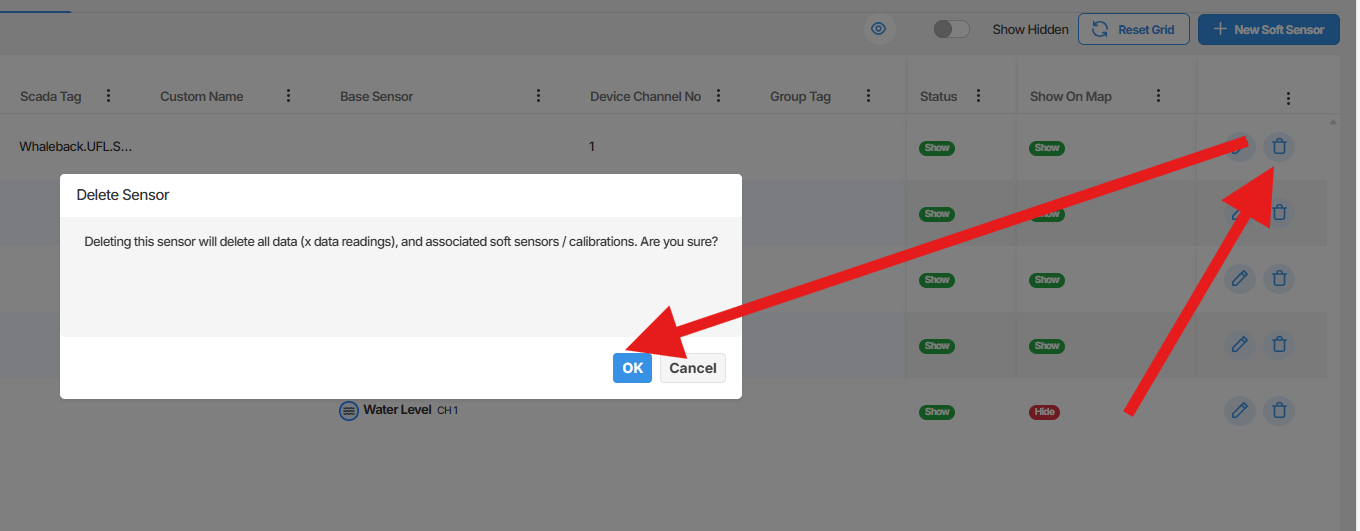
To delete a channel:
- Locate the channel you want to remove.
- Click the Delete button on the channel row.
- Then you will get option to click on ok for confirmation.
Creating a soft sensor
Section titled “Creating a soft sensor”A soft sensor is a copy of an existing channel that allows you to apply additional processing or display the same data in a different context. You can create a soft sensor directly from the Channels tab.
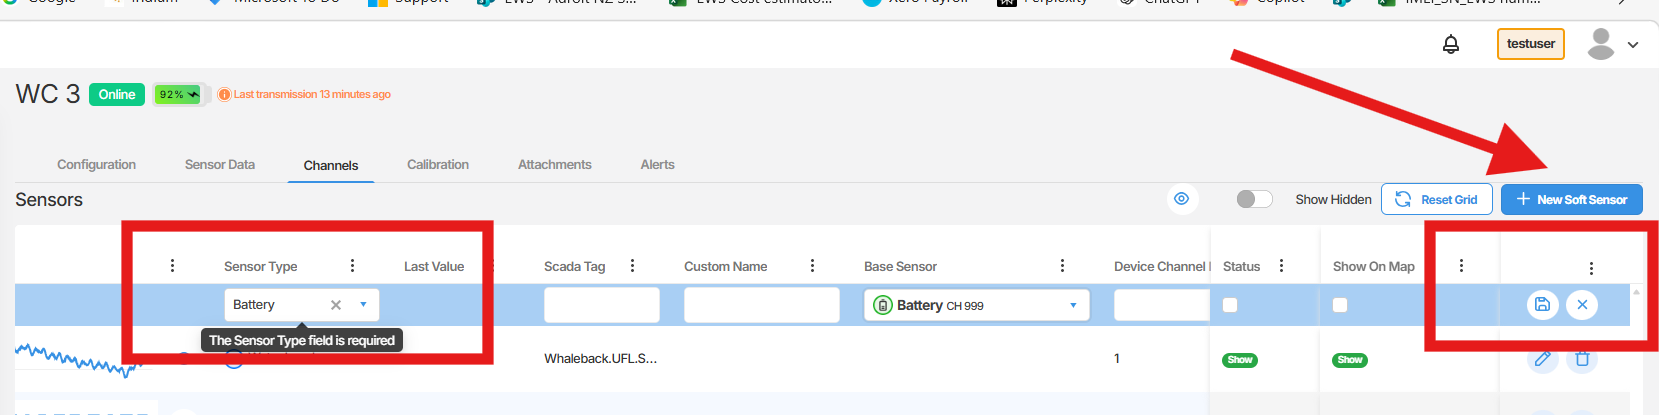
To create a soft sensor:
- Click the New Soft Sensor button in the top-right corner of the Channels tab.
- A new soft sensor entry is created. Fill in the following required fields:
-
- Sensor Type - select the appropriate type from the pick list
- Base Sensor - select the channel you want this soft sensor to copy
- Optionally, fill in the Scada Tag and Custom Name fields if you have this information available or if it is required for your configuration.
- Click Save to create the soft sensor.
The new soft sensor will appear in the channel list alongside your physical channels.
Viewing detailed channel data
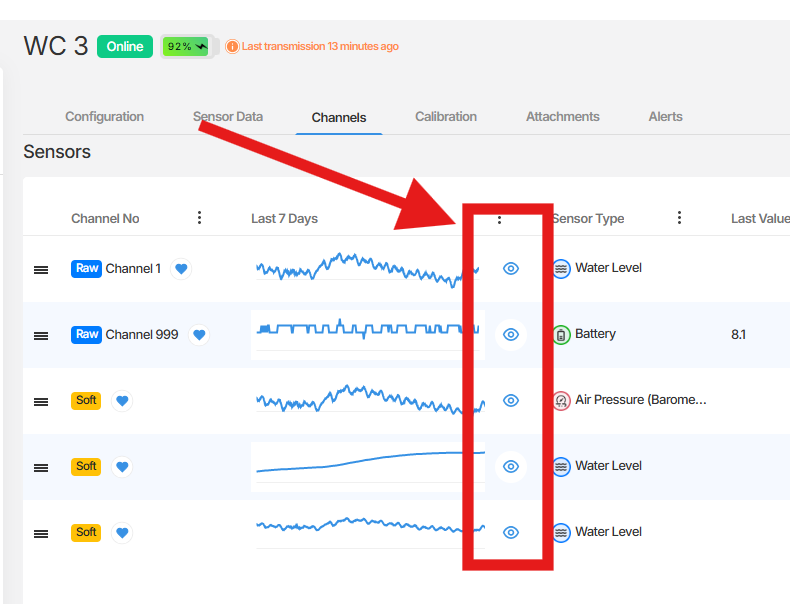
Section titled “Viewing detailed channel data”For a more detailed view of an individual channel’s readings, click the eye icon on the channel row. This will take you to the Sensor Data tab for that channel, where you can review historical data, adjust the date range, and export readings.
 Summary
The Channels tab provides a comprehensive overview of all channels and soft sensors on a device, combining summary data, recent graphs, and management tools in a single view. From this tab, Super Users and Tenant Admins can edit channel details, manage visibility, delete channels, and create soft sensors. All users can view channel information and navigate through to detailed sensor data.
Next Steps
Section titled “Next Steps”- Review your device channels and update any Scada Tag or Custom Name fields that are missing.
- Set the Sensor Type for any channels currently labelled as Unallocated.
- Hide any channels that are not currently in use to keep your view organised.
- Click the eye icon on any channel to view its detailed historical data in the Sensor Data tab.
Related articles
Section titled “Related articles”- Viewing device sensor data in Orion Data
- Understanding devices in Orion Data
- Working with calibrations in Orion Data
- Setting up device alarms in Orion Data