

Set up devices
Upload and manage device attachments
Upload files to device folders and use the attachment management controls.
This is useful for keeping installation documentation, site photographs, data sheets, and any other reference material organised and accessible alongside your device configuration. Only users with a Super User or Admin role can upload, move, or delete attachments.
Navigating to the Attachments tab
Section titled “Navigating to the Attachments tab”- Open the Devices section from the main navigation.
- Locate the device you want to work with using its serial number or IMEI number.
- Click the right arrow on the device row to open the device configuration page.
- Select the fifth tab, labelled Attachments.
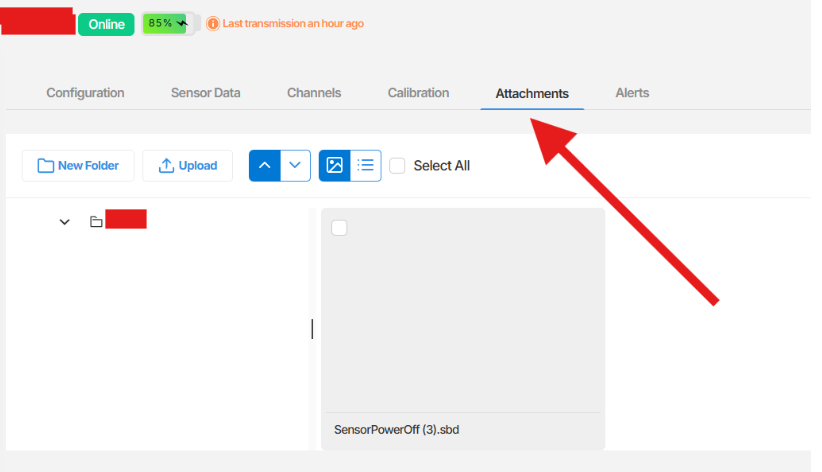
Understanding the folder structure
When a device is named, a folder is automatically created in the Attachments tab using the device name. For example, a device named EWS Australia will have a folder called EWS Australia pre-created.
You can create sub-folders within this structure to further organise your files.
- Click the New Folder button.
- Enter a name for the sub-folder.
- Click on create button.
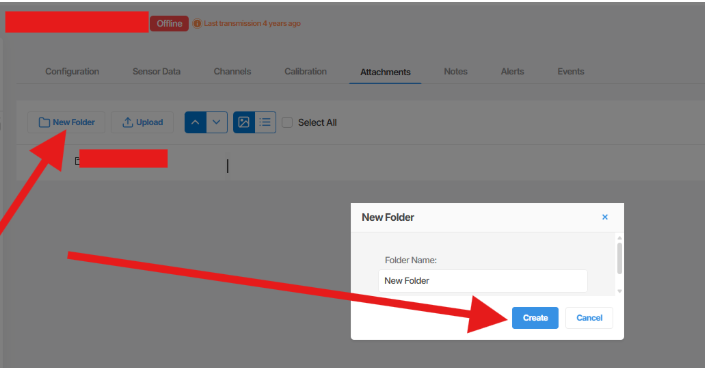
Uploading files
- Navigate to the folder or sub-folder where you want to upload files.
- Click the Upload button. An upload panel will appear.
- Click Select Files to browse and select one or more files, or drag and drop files directly into the panel.
- Once your files are selected, click Upload to complete the process.
Your files will appear in the attachments list on the middle or right side of the screen once the upload is complete.
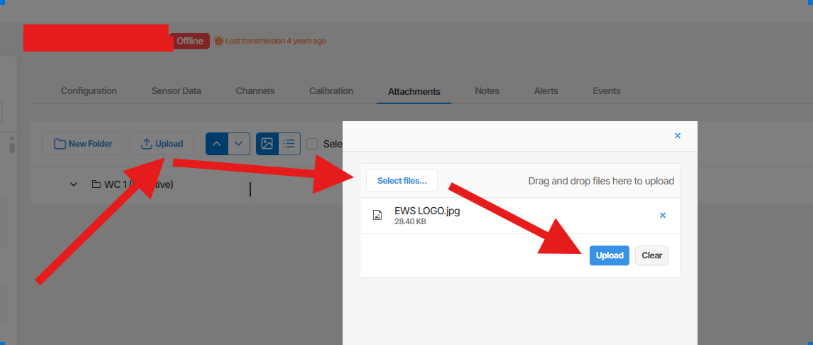
Managing uploaded files
Section titled “Managing uploaded files”Once files are uploaded, you can view, download, move, or delete them from the Attachments tab.
To perform an action on a file:
- Select the file by ticking its checkbox.
- Right-click the file to open the context menu.
- Choose one of the following options:
-
- Download - saves the file to your computer
- Delete - permanently removes the file from the attachment library
- Move - relocates the file to another sub-folder within the device’s attachment structure
- View - opens the file directly in the platform, available for supported file types only.
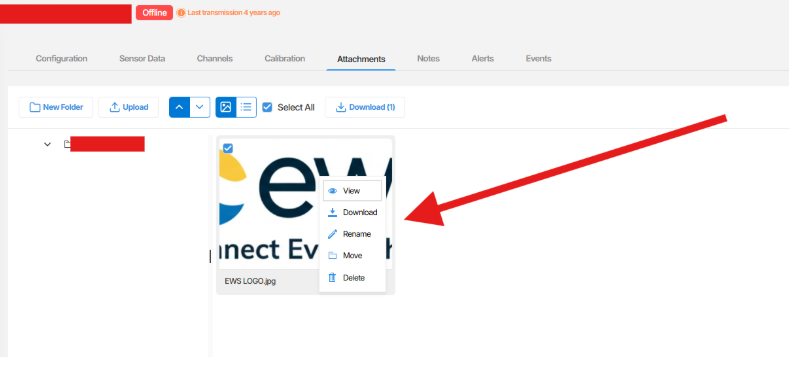
Switching between view modes
Section titled “Switching between view modes”The Attachments tab supports two display modes. Use the icons in the top-right area of the file panel to switch between them.
- Thumbnail view - displays files as visual previews. Select this using the image icon.
- Grid view - displays files in a list with details including file name and creation date. Select this using the three-line icon.
Summary
Section titled “Summary”This article explained how to navigate to the Attachments tab on a device configuration page, create sub-folders, upload files, and manage attachments using the right-click context menu. It also covered how to switch between thumbnail and grid view. Access to this feature is restricted to Super User and Admin roles.
Next Steps
Section titled “Next Steps”- Review the files already stored against your devices to confirm the folder structure meets your organisation’s needs.
- Create sub-folders to categorise attachments by type, such as installation photos, calibration records, or compliance documents.
- Confirm that team members who require access to attachments have the appropriate role assigned.
Related articles
Section titled “Related articles”- Managing device configuration
- Understanding user roles and permissions in Orion Data
- Adding notes to a device